Bubble Your Way to a Yard You Actually Use
March 1st, 2016
You paid a lot for that yard of yours.
So why do you mostly just look at it instead of use it? Wouldn’t you rather enjoy it more and mow it less?
I see this a lot in my Garden House-Calls travels. And I don’t think it’s because people like it that way.
I suspect it’s because we’ve been conditioned to think of our yards as the lawn, and anything else is an alteration or addition to that sacred standard.
Most people limit themselves to the “normal” additions – things like attaching a deck to the back door, planting shrubs in a 4-foot strip around the house foundation, and eventually adding screen plantings along the property lines (usually arborvitae) for a modicum of privacy.
That might be normal, but it’s not very inviting.
It usually leaves you sitting out on a hot deck that seems more like a stage than a retreat.
It leaves you looking at tall, boring, green arborvitae walls fronted by little green blades that keep yelling for you to cut them.
Or if you skip the arborvitae, it leaves you with a 2-inch-tall sea of green that flows anonymously from one yard to the next, making it hard to tell where your yard ends and the next one begins.
Most people don’t find any of that very cozy or comfortable. Something doesn’t “feel” right. The question is, why not? And more importantly, what do you do about it?
Try this while you’re in winter garden-dreaming mode. Rethink your outdoor space the same way you look at the space inside your house.
Indoor space is divided by walls, ceilings and doorways into individual rooms, each with its own purpose. The rooms’ sizes are dictated by how you use them (and by budget), and they’re decorated according to your tastes and by what you plan to do in each room.
Very few people do that outside. Most never think about carving up outdoor space into logical smaller parts, and that’s why something still doesn’t look right even when you take bites out of the lawn as you go along.
It’s why the trees look like they’ve been randomly placed instead of serving some good purpose.
It’s why island gardens look more like puzzle pieces waiting to be put together instead of flowing seamlessly into one another.
It’s why a water garden ends up isolated in the middle of a lawn, looking like someone pushed it out of a helicopter.
Coming up with a game plan for “outdoor rooms” can help you sidestep all of that.
Don’t start by going to the garden center and buying a bunch of plants, then agonizing over where to put them when you get home. That’s the last step, but it’s what most people do first.
Start instead by thinking about how you’d like to use the yard. Do you do a lot of entertaining? Do you need space for the kids and pets to run around? Do you want a hammock? A place to cook and/or eat outside? A quiet place to sit and read? A water feature? A vegetable garden? A shed? A place to hide the trash cans or hang the wash? A place to display your bowling ball collection?
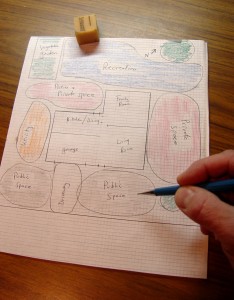
Once you’ve identified the uses, get a piece of paper, a pencil and a big eraser. Roughly draw the shape of your lot and the permanent features on it, such as your house, garage, sidewalks, patio, etc. If you’re a Type A personality, go ahead and use graph paper and actual measurements.
Either way, the goal is to make a “bubble diagram” that will assign spaces to the uses you’ve just identified. Think about what makes most sense where and begin to block out spaces for them.
The size of each block or “bubble” will be dictated by how much space you need for a particular use and, obviously, by the size of your lot.
You may not be able to fit everything in, and you may need to reduce the wish-list size of your husband’s putting green to make room for the kids’ swing set. You may find yourself shuffling a few things around. That’s where the big eraser comes in.
You might even be surprised at how much of this stuff dictates itself once you get started.
That slope in the backyard might not lend itself very well to a play area, but it might be the perfect place to run a cascading water feature into a small pond.
That sunny spot next to the patio might be the perfect spot for that herb garden on your list because it’s right outside the kitchen door.
The back left corner might be the ideal site for that hammock and sitting area because it’s already partly secluded by the neighbor’s arborvitae wall. Add a shade tree and that shed you’ve been wanting, and the future retreat can be nestled between.
Once you’re happy with how you’ve bubbled things out, you’ll have a drawing that’s similar to a house plan. The job is then to start dividing the yard into their assigned uses and spaces.
Just as inside, you’ll do that with walls, doors, ceilings and floors.
Outdoor walls can be things like trimmed evergreen hedges, more natural mixed hedges, border gardens, fences, stone walls and vine-covered trellises. The choice is yours, depending on how much privacy you want and how open you want each room to be. A knee-high stone wall or border garden, for example, can give a room effect to an area without making it too confined or segregated.
Think of the doors as the way you enter and exit each outdoor area. These could be something door-like, such as a gate or an arbor, or they could be something more subtle, such as a pair of tall grasses or a pair of flower pots on either side of an area’s end.
Outdoor “ceilings” are for areas where you want enclosure. These also can vary from natural coverings such as the canopy of a shade tree or a vine-covered pergola to more structured choices such as an awning or sky-lighted roof. You may not want ceilings at all in some spots, such as over the soccer area or vegetable garden.
Finally, the outdoor “floors” can range from naturals such as grass and mulched paths to more structured choices such as wood decking, paver-block patios or brick paths. Changing the flooring is another way to mark the different rooms, but don’t get too carried away with too many different materials.
Coordinating materials helps marry the house to the landscape so it looks like you planned it all from the start. Examples: If you’ve got gray stone on your house, choose a similar stone for edging walls and garden pathways. If your shutters are black, consider black wrought-iron fencing and arbors. If your house siding is light blue, paint your trellises dark blue or go with dark-blue pots by the patio exit.
Also look to the house for cues on where to start and end your outdoor rooms. Obvious reference points would be house corners, locations of doors and windows, and where you already have courtyards or rooms juting out.
Get your main elements and hardscaping (walls, patios, paths, etc.) in place first, then turn to plants as your “furniture.” Think of finishing touches such as gazing globes, statuary and the like as your accessories.
If you pull it off, it should feel like you’re in a cozy room instead of a yard.
Top it all off with low-voltage landscape lighting, and you won’t want to go back inside. Not even at night.
Hmmmm. How about a garden bedroom?


