Gardening in Straw
May 21st, 2013
Bad back? Bad soil? No soil?
No problem, says Minnesota horticulturist Joel Karsten, who’s emerged as the leading apostle of 2013’s hottest gardening technique – growing veggies out of straw bales.
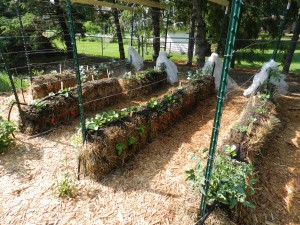
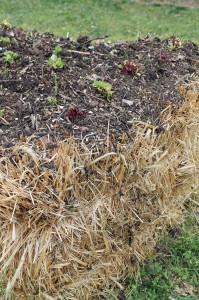
Instead of planting in lousy, compacted soil and then fighting weeds, this idea involves laying straw bales on most any surface and then planting into the top of them.
The idea isn’t exactly new.
Middle Easterners and Eastern Europeans have long grown out of straw to overcome atrocious salty soil, and growers here looked at growing young plants in bales before leaning toward perlite.
If you’ve ever seen volunteer pumpkins growing out of a compost pile or a neglected straw bale, you get the basic premise.
What Karsten has done is perfect what he calls “conditioning” bales so they become little self-feeding growing boxes.
His system seems to be one of those things that hit the right nerve at the right time.
Karsten’s Facebook page has 25,000 likes, and he’s sold tens of thousands of print and ebook tracts on his straw-bale how-to system.
His new book, “Straw Bale Gardening” (Cool Springs Press, $19.99), has become one of this spring’s hottest gardening titles.
Essentially, straw bale gardening is container gardening, except you end up with a half-decayed pile of compost at season’s end instead of empty pots.
“The garden can be set up in mere minutes in virtually any location, and no soil is required,” says Karsten. “The bales are portable, fairly light-weight, relatively inexpensive and not super hard to find.
“The bale serves as the container and the media, so the entry cost is very low, and the results are no fail if the proper steps to condition the bales are followed.”
Karsten says the biggest plus, though, is the lack of weeding.
Assuming you buy straw and not hay with the grain seeds still attached, you shouldn’t see much more than a few stray weeds that pull out easily.
Straw bales sell locally in garden centers, ag stores and home centers for $5 to $8.
Karsten says the idea is going like gangbusters because it appeals to a confluence of current desires.
The influx of rookie gardeners likes it, he says, because it’s quick, easy, cheap and comes with high odds of success despite limited gardening experience.
It’s also ideal for renters and those with small yards.
Older, experienced gardeners like it, Karsten says, because it eliminates back-breaking digging and weeding and allows knee-high harvesting.
And because growth is happening in fresh “containers” every year without soil, it’s a solution for people who battle overwintering disease in their in-ground gardens.
Karsten got interested in straw bale gardening soon after he moved into his first house and encountered compacted construction fill – nothing like the soil he remembered growing up on his family’s tree farm.
One day he read an article that mentioned how well seedlings grow out of compost piles, and that triggered memories of the impressive weeds that used to grow out of discarded straw bales back on the farm.
So he and his dad began experimenting with planting veggies in bales.
They found the key was conditioning the bales for 12 days before planting with alternating days of fertilizer and daily soakings of water – in particular, air-temperature water.
“The goal is to partially compost the bales, just enough to get them cooking before plants or seeds are introduced,” Karsten says. (See below for more details on this.)
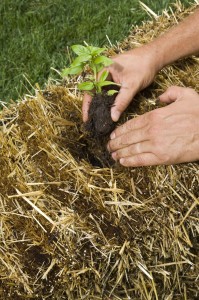
Transplants then are inserted into slits in the bale (cut end up) and heeled in with a little potting mix.
For seeds, spread a 1- to 2-inch layer of potting mix over the top of the conditioned bale and plant.
After that, the trick is keeping the bales damp.
That’s the most likely issue that will prevent success, as Lower Paxton Twp. gardener Susan Norris found in a pair of experimental bales planted last summer at the Harrisburg Boys and Girls Club garden on Berryhill Street.
“We wet the bales thoroughly and dug small holes, filled them with compost, planted peppers and waited,” she says. “But the bales dried out and nothing grew. We watered the bales twice a week. We weren’t there every day. I think they should be watered every day in hot weather.”
That’s exactly what Karsten recommends. He says the ultimate watering game plan is to lay a soaker hose across the top of the bales and connect it to an automatic timer.
“Farmer Jane” Del Sordo had better results with the bales planted last year in the courtyard of the Bethany Village Skilled Unit in Lower Allen Twp.
“We got beautiful zucchinis,” she says. “The leaves were humongous. We couldn’t get the pumpkin vines to produce any pumpkins, though.”
Del Sordo, the unit’s activities coordinator, says the Bethany residents did condition the bales in advance and managed to water almost every day.
“You can’t just plant them and walk away,” she says. “We watered when they started to dry out. You have to go by the weather.”
“The thing that’s really nice about growing in bales,” she adds, “is you can do it right on the ground. It’s good for people who don’t have ground.”
Karsten’s book has diagrams on how to plant entire gardens out of straw bales, including right on top of a patio or driveway.
“It really doesn’t matter what you have underneath them,” says Karsten. “This is great for people who are convinced their yard won’t grow anything.”
How to Plant in Straw Bales
Joel Karsten’s tips for getting a straw bale ready to plant:
Day 1: Set the bales so the cut ends are facing up and down. Secure them with posts, especially if you’re using multiple bales or growing in windy or sloped areas.
Evenly scatter a half cup of cheap lawn fertilizer over the top of each bale (something with at least 20 percent nitrogen, i.e. 20 or more as the first number on the three-digit formula on the bag).
Avoid any product that contains weed-killers or weed-preventers and that lists “slow-release nitrogen.”
Organic gardeners can substitute with blood meal, feather meal or an organic lawn fertilizer such as Milorganite or Espoma Organic Lawn Food. Use 3 cups of this per bale instead of just a half of a cup.
Then soak the bales until water comes out the bottom, ideally with air-temperature water, such as that collected in rain barrels.
Days 2, 4 and 6: Just soak with air-temperature water.
Days 3 and 5: Scatter again with the same amounts of fertilizer as on Day 1 and soak with air-temperature water.
Days 7, 8 and 9: Scatter again with fertilizer, except reduce amounts to one-quarter of a cup of lawn fertilizer or 1½ cups of organic fertilizer. Soak with air-temperature water.
Day 10: Fertilize with 1 cup of 10-10-10 granular fertilizer or 3 cups of a balanced organic fertilizer (i.e. one that also adds phosphorus and potassium). Soak with air-temperature water.
Let the bale sit a day and then plant on day 12 (or ideally by day 18).
Add a balanced liquid or organic fertilizer every few weeks during the growing season, and be sure to keep the straw damp at all times.


