Mulch Thought Went into This
May 7th, 2013
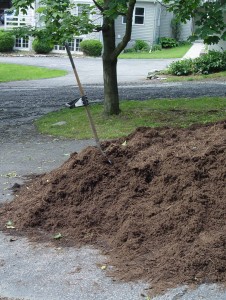
Now’s the time of year when driveways all across suburbia start sprouting large brown mounds.
That’s right, it’s prime time for mulching. And this is one gardening job that most people time correctly.
Mulch is our front-line weed defense, and it makes sense to get it down before most weeds germinate, yet not so early that you’re keeping the soil from warming up at the end of a cold, wet spring.
The dilemma I always run into is cramming mulch work into that narrow window between when the spring bulbs are ready to come down and new annuals are ready to go in.
If you don’t do much in the way of daffs and tulips and hyacinths, it’s much easier. Just get your new mulch layer down before the perennials get going and before you plant your annuals. You’ve got weeks from early April to mid-May in that case.
Some people mulch first and then plant their annuals.
Either way is fine. Just go easy on any mulch around annuals. One inch is plenty… and keep it back from touching the tender, young stems.
What gets me as an obsessive bulb-planter is that my bulb foliage usually isn’t “ripe” enough to cut yet when I’d like to get my summer annuals planted in that space (right around Mother’s Day).
You’ll weaken the bulbs and their future bloomability if you cut the foliage while it’s still green and making nutrition.
So what I do is mulch around the bulb foliage, then plant the annuals as soon as I cut the bulb foliage in a few weeks. It’s not an ideal arrangement, but at least the mulching is done before the bulb/annual switchover.
If I had the time, I’d do it all in one shot in this order: A.) Cut the bulb foliage when it’s yellowing, B.) Lay down a fresh 1-inch layer of mulch where the annuals will go (assuming there’s not already an inch left over), and C.) Plant the new annuals into it.
Since that’s not going to happen any time this side of retirement, I do what I can when I can. Lately, I’ve been shifting about half of my mulching to fall after the annuals are out and many of the perennials are cut back.
While an inch is plenty around annuals, 1 to 2 inches is good for around perennials and 2 to 3 inches is good for around trees and shrubs. That’s total, by the way. If you’re shooting for a 2-inch layer, for example, and you already have an inch left from last year, then just add a 1-inch topping.
Don’t keep dumping more and more on top so you end up with a thick crust that can interfere with the soil’s oxygen intake and its ability to take on water in dry weather and give it up after a heavy rain.
That brings us to the big question of what kind of mulch to use. For what it’s worth, here’s my Twitterish opinions on various types:
* Shredded hardwood. Also referred to as “tanbark,” this is the most common kind that’s made of ground-up wood. It’s cheap, readily available and does an excellent weed-choking job. But it’s also prone to growing the artillery fungus that shoots those annoying sticky dots onto siding and to crusting over, at which stage it repels water. Shredded hardwood is best on slopes (where its crusting tendency is a plus) and shrub beds away from surfaces where you don’t want to risk artillery fungus.
* Bark mulch. My favorite choice because it isn’t a likely source of artillery fungus, it looks natural and it “breathes” better than the knit-together shredded hardwood. It’s available in bulk or bags, although not all mulch vendors sell by bulk. I like the ground-up, nearly soil-like version of it as opposed to bark nuggets (look like big brown cookies to me) or mini-nuggets (which slide down banks and sometimes blow around).
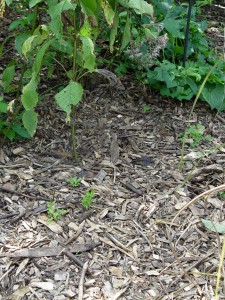
* Wood chips. Also an excellent choice, these are more thick flakes than shreds and come from tree companies cutting down dead or overgrown trees. Some people don’t like them because they look a little “rough” compared to that brown-carpet look of shredded hardwood. But chips can be cheap (maybe even free), and they don’t “rob the soil of nitrogen” as often accused (at least not to any meaningful degree where it counts in the root zone).
* Colored mulch. Pass. First, these dyed mulches look unnatural to me, especially the brick-red version. Second, I suspect some of this wood comes from ground-up pallets that may have who-knows-what, depending on what was shipped on them. And third, it’s hard to say what’s all in the colorant. Black, from what I’ve read, contains “carbon black,” which comes from burned coal tar. And fourth, I’ve had users tell me they’ve had the dye wash off in cases where it wasn’t processed correctly. It’s also more expensive.
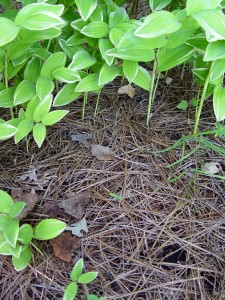
* Pine needles. I like them. They breathe well, they’re a good way to recycle natural materials, and they don’t cause excess soil acidity as some people believe. These are widely used in the South. I’m not sure why they’ve never caught on here. I think it’s because Northerners just aren’t used to the look. As a result, they’re also not readily available here, and when they are, they’re expensive.
* Mulch over weed fabric. This sounds like a good idea to people trying to reduce maintenance. Unfortunately, it doesn’t work out that way long term. At first, the combination seems to do a great tag-team job. But then as the mulch breaks down, it becomes an excellent weed-germination medium. By years 4 and 5, I typically see grassy weeds coming up through microscopic holes in the fabric, weeds growing on top in the decomposed mulch, and plants gasping for air from the fabric’s interference with the soil’s oxygen-exchange and evaporation ability. You could pull or spray the weeds or put down new mulch at that point, but if you’re doing that anyway, what’s the point of the fabric?
* Stone over weed fabric. Stone alone doesn’t do a very good weed-preventing job, unless you put down a heckuva lot of it (back-breaking and expensive). The thinking is that if you put fabric underneath, the two will do the job. But similar to mulch over fabric, you’re good for the first year or two, but then leaves and dirt blow in to make a good weed-germination medium. And again, the fabric interferes with soil oxygen exchange and evaporation. This option is a decent one in pathways where you’re not growing plants, but be aware you’ll still have to do some weed policing down the line – or take up everything to clean it out and start over if/when the weed outbreaks get bad enough.
* Leaves and/or grass clippings. Both good because they’re natural and recyclable (and free) on-site materials that add organic matter and nutrients as they break down. Leaves work best when they’re shredded (less likely to mat down), but they’re fine when left where they fall at moderate levels to mulch tree, shrub and evergreen beds. Grass clips are good when no herbicide has been used and when they’ve been left to dry a bit first. Green ones can heat up and cause plant wilting. These are my top two picks for veggie gardens. They do break down fairly fast, though, so you’re getting one season – if even that – from them.
* Cocoa shells. Even Hershey Gardens doesn’t use this as mulch, so that should tell you something. I’ve seen them blow around and also mold. They’re not that great of a weed-preventer in the first place, and they’re more expensive than most mulches. Some people question pesticide content. The main attraction is the chocolately scent, but that goes away quickly once the shells are laid out in the air.
* Peat moss, mushroom soil or compost. Definitely not peat moss. It dries fast and then doesn’t rewet well. The other two are excellent soil amendments (i.e. worked into the soil to improve it), but they’re not all that great on top as mulch. One reason: weeds germinate very well in this good stuff. Bark and wood block sprouting much better.


