Seed-Starting 101
February 12th, 2013
You don’t need a greenhouse, a fancy light contraption or even special “grow lights” to start plants from seed.
Even beginners can start a big chunk of their gardens inside on the cheap, using mostly free and recycled materials.
It’s easier than you think, and now’s the time to get started.
Why bother?
* You’ll save a bundle of money.
* It gives you way more choice. Seed catalogs and online vendors have anything you could possibly want. Afghan melons or white habanero peppers anyone?
* You control the timing so you’ll have ready transplants whenever you want them.
* You can save seeds from some of the non-hybrid plants to reduce seed cost in the future.
* It extends the growing fun for antsy gardeners. How can you go stir-crazy with baby broccoli growing in the basement?
I’ve been starting seeds for 20 years in an unheated basement that doesn’t even have windows. Here’s my system:
1.) Gather some used plastic containers – margarine tubs, cut-off milk containers, yogurt cups, etc. Clean ‘em. Drill or poke 8 or 10 small holes in the bottom for drainage.
2.) Buy a bag of vermiculite (light, fluffy, water-holding stuff) at the garden center. Fill each container about two-thirds full with vermiculite.
Label the container using masking tape or the back of an old plastic plant label. Scatter seeds over the surface and cover with a light layer of more vermiculite.
Note: The seed pack will tell you how much to cover each variety. Some seeds need light to sprout and need no cover.
3.) Place containers on a recycled cleaned foam meat tray from the grocery store or in a plastic seedling tray from the garden center ($2). Gently sprinkle the surface with water. I use the sink sprayer. Add enough water so the vermiculite is saturated and draining out the bottom.
4.) Cover the containers with plastic wrap, ideally recycled from kitchen use. Set the trays near a sunny window at room temperature.
Note: Consult the seed packet for ideal sprouting temperatures of each variety. Most prefer the 70- to 75-degree range, but a few like it warmer. Set warmth-lovers on top of an appliance (water heater, TV, refrigerator) or buy a heat mat from the garden center.
5.) Within 5 to 7 days, some seedlings will emerge. Others may take up to 3 weeks. Check moisture every few days and lightly spritz the surface if it’s drying.

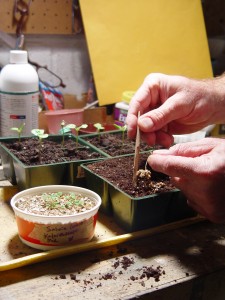
Use a small, pointy object to transplant young seedlings from the vermiculite to cell packs.
6.) Once the first set of leaves have unfurled, use a pencil, carved Popsicle stick or other pointy object to lift each seedling out and into individual pots.
For smaller transplants like lettuce, broccoli and marigolds, use recycled plastic 6-packs from past purchases. Be sure to clean these well and soak in a 10-percent bleach solution for 15 minutes before using.
Don’t have any? Bum some from friends or neighbors or buy new ones that you can re-use for years.
For bigger transplants such as tomatoes, pepper or a specimen annual flower, use recycled 4-inch pots – also cleaned and sterilized.
Fill these pots and 6-packs with slightly pre-moistened potting mix. DON’T scrimp on quality here! Avoid heavy, cheapo potting soil.
When moving the seedlings, handle by the leaves, not the stems. Torn leaves can be replaced. Squish a stem and the baby plant is dead.
Label each pot or pack. Set the pots and packs in plastic seedling trays (also re-usable for years). Be sure to sterilize them, too, and check for leaks.
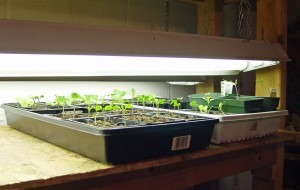
7.) Set the trays under ordinary fluorescent workshop lights. Hang the lights from chains and hooks so you can adjust the height. For best results, keep the lights 2 or 3 inches above the plants.
I built a three-tier seed-starting station out of scrap 2-by-4’s and plywood. Mine is a little over 4 feet wide (to accommodate the 48-inch light fixtures) and 2 feet deep (slightly more than the length of a seedling tray). I hang two lights – side by side – on each level.
My little seed city holds 12 trays of about 36 plants each – four trays set longways on each level.

Seedlings growing under workshop lights.
8.) Add water with quarter- to half-strength fertilizer to the trays, not over the top of the plants. “Bottom-watering” allows the potting mix to soak up the water that’s needed, is less disturbing to baby roots and is less likely to cause disease related to wet plant leaves. Go with a balanced-formula fertilizer, something along the lines of 20-20-20 on the label.
Add only enough water to the trays so that the plants soak it all up in 15 or 20 minutes. Pour out excess after that time and water less next time. When done, the potting mix should be damp up to the surface with no standing water.
Check every few days and add more water when the surface is drying and the tray’s weight is noticeably lighter.
9.) Lights should be on 14 to 16 hours per day. Save work by investing in an ordinary light timer ($10 or less).
Ideally, use one cool-white and one warm-white tube in each fixture.
A totally dark basement is fine for growing. The workshop light alone is sufficient for seedlings.
Seedlings will grow stockier in a cool basement with temperatures around 50 degrees. Warmer room temperatures encourage faster growth, and without good light, that can make seedlings tall and “leggy.”
Room temperature combined with less-than-ideal natural light is what usually makes window-grown seedlings leggy.
Option: Place a fan set on low to blow over the seedlings. This also encourages stockier growth and discourages disease.
10.) Once the seedlings get to transplant size, take them outside to “harden off.” Set them in shade for a couple of hours the first day, then gradually give more light and more time out until they’re outside round the clock for a couple of days before planting. Hardening off should take 7 to 10 days.
Congratulations. You did it.
When should you start what from seed?
First, decide when you want finished plants ready to go in the garden.
Some varieties are frost-tolerant and can be planted in the cooler weather of late March through April. Examples: cabbage, broccoli, lettuce, cauliflower, parsley, kale.
Other varieties shouldn’t be planted outside until after frost. The average last killing frost date for Harrisburg is May 11. Examples of plants to plant after that: pepper, tomato, eggplant, basil, cucumber, melons.
Consult the seed packs to see long how it’s going to take a variety to sprout and how long it needs to grow inside to reach transplantable size.
Add the time to sprout (generally 5 to 20 days), time to grow (6 to 10 weeks) and time to harden off outside (7 to 10 days). Count backwards from the desired planting date, and that’ll tell you when to start the seeds.
I start my seeds in three main waves:
* Wave 1 (start late January to early February for planting out in late March): Broccoli, cabbage, kale, leek, onion, lettuce, parsley
* Wave 2 (start mid to late February for planting out in mid April to early May): Cauliflower, collards, kohlrabi, more lettuce, Swiss chard, snapdragon
* Wave 3: (start early to mid March for planting out after frost in mid to late May): Basil, cantaloupe, cucumber, eggplant, pepper, tomato, watermelon, most annual flowers
Some of the easiest plants to start from seed inside:
Vegetables/herbs: Basil, broccoli, cabbage, cantaloupe, cauliflower, cucumber, eggplant, leek, lettuce, onion, pepper, Swiss chard, tomato, watermelon
Annual flowers: Ageratum, alyssum, celosia, cleome, cornflower, cosmos, dahlia, gloriosa daisy, hollyhock, impatiens, marigold, nicotiana, petunia, phlox, salvia, snapdragon, vinca, zinnia
Vegetables that are best direct-seeded into the garden: peas, spinach, carrots, radishes, mesclun, orach, shallots, onion sets, parsnips, turnips, potatoes, red beets, Swiss chard, collards, kohlrabi, mustard, okra, beans, lima beans, corn, pumpkins, Malabar spinach, sweet potatoes, squash.
Note: Some seed-starters use a one-step approach in which seeds are both started and grown in pots filled with seed-starting mix or potting mix.


